Flooring Options For Garden Sheds

Do sheds come with a floor? Usually not. Almost every steel shed sold in Australia, including ours, arrives without one. The base is left for the buyer to sort out, and most people only find that out after they have paid. It is the single most skipped decision in the whole process, and the one that decides how long the shed lasts.
This guide covers how to choose, and how to tell a good base from a bad one.
What are your options for a shed base?
For most sheds, the best base is a 100mm concrete slab. It lasts the longest, sheds water instead of holding it, and it is the only base a shed can be properly anchored to. It is also the only base that carries a wind rating. Timber floors and raised sub-floors are the practical alternative on sloped or rocky ground.
The rest of this guide is about matching that answer to your specific site.
Why the floor decides how long your shed lasts
Rust starts at the bottom and works up. A shed sitting on bare or unprepared ground stays damp around the base after every downpour, and that constant moisture against the steel is the most common cause of a shed failing early. It is almost never the roof that goes first.
A proper base does four things:
- Keeps ground moisture away from the steel
- Gives you a level, stable surface that will not shift or subside
- Gives the shed something to be anchored to, against wind and against theft
- Protects what you are storing inside
Get the base right and the shed above it lasts decades. Get it wrong and nothing else about the shed matters.
Do you need a concrete slab?
If your shed needs a building permit, yes. A concrete slab is mandatory. There are no alternatives, because there is no supporting engineering for a permitted shed on a timber floor, a pier-only base, compacted gravel or anything else. If your shed does not need a permit, a slab is still strongly recommended, and it is required if you want an N3 wind rating.
Three things push you towards using a slab:
- A building permit. Permit requirements vary by council and by state, and they change. Check the rules that apply to your address with your local council before you commit to a base, or see our Council & Permits FAQ for how permits work and where we can help.
- A roller door. Roller door sheds are top heavy and have to be fixed to a slab.
- Wind exposure. Open blocks, hilltops, coastal and near-water sites all need the shed anchored properly to concrete.
- Size matters too, but it is not the test people think it is. A bigger shed is a bigger target for windy locations, and a heavier load on the ground, so the larger the shed, the harder it is to justify anything other than concrete.
What does a properly prepared slab look like?
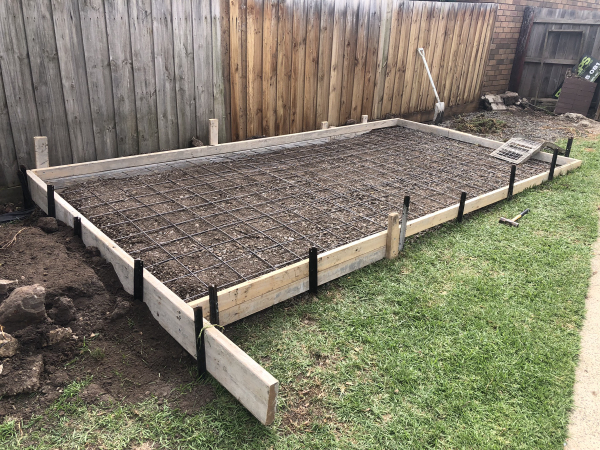
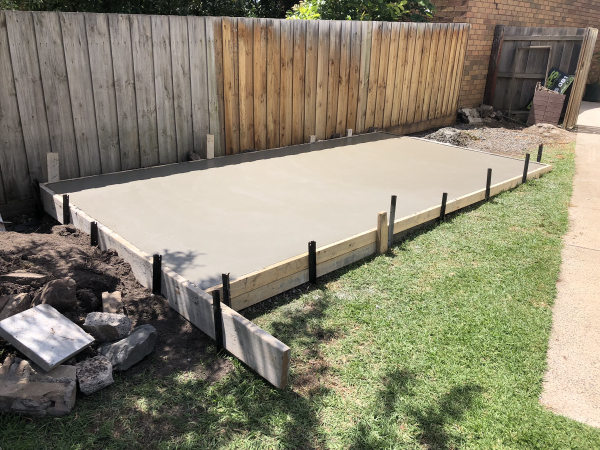
A shed slab should be at least 100mm thick with a minimum SL62 reinforcing mesh, poured on a levelled and stabilised base, and left to cure for one to two weeks before the shed goes on it. Level and water runoff should be agreed with whoever is pouring it before the job starts, not after.
Preparing the site means:
- Removing soft and organic material from the soil, so the slab is not sitting on anything that will move
- Adding crushed rock to level and stabilise the site, and to help drain water away from the base
- Setting boxing high enough to enclose a 100mm slab
- Suspending reinforcing mesh inside the box so it sits within the concrete rather than on the ground
- Pouring, levelling and letting it cure fully before installation
That list is worth keeping if you are getting quotes from local trades. Cheap slabs get cheap by going thin, skipping the mesh, or pouring straight onto soft ground, and none of that is visible once the shed is up. Ask for the thickness and the mesh spec in writing, and compare quotes on the same basis.
Rebated slab, flat slab or sheets past the edge?
There are three slab details that work under a steel shed. We recommend a rebated slab, where the finished slab is the same size as the shed and the walls sit into a shaped ledge at the edge, or running the wall sheets past the edge of a flat slab on a steel framed shed. Both keep water out at the base.
A rebated slab gives an excellent water seal and suits relatively flat sites. The concrete and the shed go in on the same day, which makes it the harder option to do yourself. Running the sheets past the edge of a flat slab gives the best watertightness of the three, because no water or debris can get under the walls. That detail is steel frame only, but it handles uneven ground, works on an existing slab, and it is the easier install.
A plain flat slab is the fallback, and the one we would steer you away from, because it is hard to stop water tracking under the wall. If you do have to use one, run a good bead of Sikaflex around the inside of the shed walls to cut down what gets through.
What to avoid completely is an infill pour, where the shed is used as the boxing and the concrete is poured up against the walls. It voids the warranty on the sheeting, risks premature corrosion, and any repair later means cutting out and replacing the floor.
If you would rather not manage any of this, we do the lot: site preparation, concreting and installation as one job, from one team.
What if concrete is not practical? Timber floors and raised sub-floors
Timber is the alternative to concrete, and it comes two ways. On flat, level, prepared ground the floor goes straight down on treated pine bearers, with no sub-floor needed. On sloped, rocky or hard-to-level ground where a slab pour is not practical, the same floor sits on a raised sub-floor. On a sub-floor, the shed sits on a level timber platform lifted clear of the ground rather than on the dirt. This option is for non-permit sheds only.
A raised sub-floor works because you are not working against a sloping ground. Instead of trucking in expensive fill to build a level pad, the posts are cut to suit the slope, sunk into post holes and set in concrete. You get a dead level, stable platform and the shed sits clear of ground moisture.
The top of a timber base frame should always sit at least 50mm above the surrounding surface, so water runs away from it rather than into it.
Reasons people choose timber over concrete:
- Your ground slopes. Levelling for concrete would need a lot of fill.
- You might move the shed later. Every SteelChief shed can be disassembled and reassembled, so a timber base keeps that option open. A slab does not.
- You want a comfortable floor. Timber is warmer and less damp underfoot than concrete, which matters if the shed is a workshop or studio.
- You are storing cardboard and paper. Concrete is porous and wicks small amounts of moisture upward, so boxes stored directly on a slab will eventually be impacted by any dampness. Timber allows more airflow.

Pavers, sleepers and star pickets: when is a simple base enough?
For small, non-permit sheds in wind-protected positions, a simpler base can be enough. Sleepers, heavy pavers or star pickets will level and anchor a small shed tucked behind a fence or garage. None of these options carry a wind rating, and none are suitable for a shed that needs a permit.
Sleepers. Position heavy timber beams under the shed walls, sink them until they are level with the ground, then erect the shed on top and screw through the bottom rail with timber screws. At least three screws per wall.
Pavers. Large pavers can work as a base if they are heavy and strong enough to take concrete anchors without cracking. You will want at least two anchors and clips per wall, and more if the site is exposed or the pavers are only medium weight.
Star pickets. For a very small shed in a protected spot, 450mm or 650mm star pickets driven into the ground along the internal base may be all you need. Drive them until they are level with the bottom rail so you can fix a tek screw through. Two per wall, three if the wall is over 3.0m long.
Wind-protected means tucked behind a house, garage or solid fence in a built-up area. An open yard, a corner block or a hilltop is not protected, even if it feels calm on a still day.
How do wind ratings affect your choice of base?
SteelChief sheds are engineered to an N3 wind rating when installed on a concrete slab. N3 covers most of the metropolitan and regional areas we service (find all locations here). Star picket and paver anchoring is not N3 rated, and suits small, wind-protected, non-permit sheds only. Where a site needs a higher rating, N4 engineering can be arranged as a custom job.
This is the part that catches people out. The rating is not a property of the shed on its own, it is a property of the shed plus the base it is fixed to. The same shed anchored to a slab and star-picketed into dirt are not the same structure.
If you are not sure which wind classification applies to your address, your local council holds the wind classification map for your area. If your site is genuinely exposed, talk to us about steel frame on a slab, and about whether N4 engineering is worth quoting.
How does the shed attach to the base?
Vertical clad steel sheds attach through BaseSmart, our L-shaped flashing along the bottom edge of the wall panels. Concrete fixing brackets attach to the flashing and are bolted to the slab, so the load path runs from the wall panel to the bracket to the concrete.
BaseSmart also fixes a problem the rest of the industry lives with. Most shed manufacturers use a U-shaped base channel, which collects leaves, dirt, clippings and water and holds all of it against the steel. That trapped moisture is a leading cause of premature rust at the base of a shed. An L-shape lets debris and water fall away instead of sitting there.
BaseSmart is a standard inclusion at no extra cost, but it is fitted to vertical clad steel sheds only. Horizontal corrugated (Horri Corri) and timber sheds use a different base detail.
For the detail on anchoring, DIY installation and who can do your slab, see the Slab & Install FAQ.
Before you pour: things people forget about the site
- Door swing. Allow clear space for hinged doors to be able to open fully.
- Boundaries and setbacks. How close you can build to a fence, and how high the shed can be, are set by your council and vary between states and even between neighbouring councils. Check your local requirements before you settle on a position, and see our Council & Permits FAQ for more info on the process.
- What is under the ground. Pipes, easements and services. An easement can rule out a position entirely, and finding out after the slab is down is expensive.
- Where the water goes. Look at where rain runs during a heavy downpour, not on a dry day. You want the shed above that path, not in it.
- Access. Both for raising your shed and for maintenance later. If you cannot get around the shed once it is up, you cannot clean or repair it.
Sort the floor before you buy the shed
The base is the part that turns a shed into something that lasts, and it is the part most suppliers leave you to work out on your own, usually after the sale. We do not.
See all of your options on our Shed Floor Options page, or talk to us about your site and we will match the base to your ground, your shed and how you plan to use it.
 Getting Your Price


